To complete the look, we need to also theme our log-in/session manager which is lightdm and get ourselves a bootsplash. This requires getting our hand a bit dirtier with editing some config files. There's no programming needed though, so it's not too difficult.
7.2. Light Display Manager (lighdm)
Lightdm is incredibly versatile, but being light, has almost no graphical configuration tools and only a few command line tools. The best way to get it themed is to edit the config files which on Debian are found at:
/etc/lightdm = the actual theme/greeter config files
/usr/share/lightdm/lightdm.conf.d/ = system provided session settings
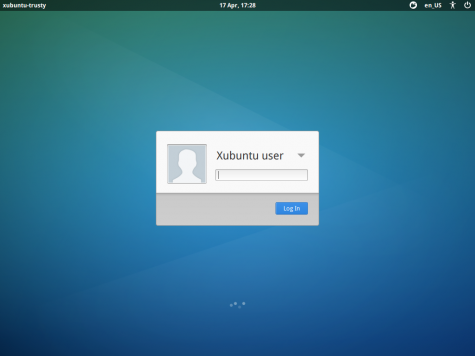
We only need to make a few rudimentary changes to the theme to get it to look like Xubuntu's log in screen:
- Log in as root or open Thunar with root privileges.
- Browse to /usr/share/lightdm/lightdm.conf.d and open the file 01_Debian.conf
- You will now see why you don't get the username displayed by default in Debian due to this line:
greeter-hide-users=true - And this line tells us what the default greeter is:
greeter-session=lightdm-greeter - We set our own configurations in /etc/lightdm and /etc/lightdm/lightdm.conf.d
- Create the above directory /etc/lightdm/lightdm.conf.d as it doesn't currently exist
- Using Thunar, right-click in the new, empty directory and select Create Document - Empty File
- Type in the filename 01_My.conf and then open it for editing
- Type in the following lines:
[SeatDefaults]
greeter-session=lightdm-gtk-greeter
greeter-hide-users=false
session-wrapper=/etc/X11/Xsession - Save the file and reboot to see the changes or carry on to the next bit...
- If you have rebooted, you will see that although you have a drop-down menu to choose the user from the theme hasn't changed. We need to edit the actual greeter config file next:
- Make a copy of /etc/lightdm/lightdm-gtk-greeter and rename the copy lightdm-gtk-greeter.bak (so you can restore it if anything goes wrong)
- Edit the file lightdm-gtk-greeter and make these alterations:
[greeter]
background=xubuntu-trusty.jpg /usr/share/xfce4/backdrops/
theme-name=Greybird-master
icon-theme-name=elementary-xfce-darker
font-name=Droid sans 10
xft-antialias=true
xft-dpi=96
xft-hintstyle=slight
xft-rgba=rgb
show-indicators=~session;~language;~a11y;~power;
show-clock=true
clock-format=%d %b, %H:%M
#keyboard=
#position=
screensaver-timeout=60 - Reboot and you should get the default Xubuntu themed login screen.
In Xubuntu, the user's desktop wallpaper is automatically shown on the lightdm login screen, overriding the one specified in the config file. This is because Xubuntu have patched xfdesktop, something which is out of the scope of this how-to:
7.3 Light-Locker
As ever conservative, you won't find light-locker in the Jessie repos or even in Sid. To get it you will need to enable the experimental repository, install it and then disable the repo. It might sound scary, but it is quite safe!
- Either using Synpatic or manually with a text editor enable the Debian experimental repository:
- http://ftp.debian.org/debian experimental main
- Reload repository information
- Install light-locker = 370KB
- Disable the repo
- Reload again
- Remove xscreensaver xscreensaver-data = frees 3370KB
- Edit the file /usr/bin/xflock4 as root. This file controls screen locking in XFCE. You just need to add the command to use light-locker to lock the screen in case xscreensaver or gnome-screensaver are not available:
# Lock by xscreensaver, gnome-screensaver or light-locker, if a respective daemon is running
for lock_cmd in \
"xscreensaver-command -lock" \
"gnome-screensaver-command --lock" \ <---- add this final forward slash \
"light-locker-command -l" <---- add this command
do
$lock_cmd >/dev/null 2>&1 && exit
done - Finally, configure the Whisker Menu so that the icons for locking and user switching actually work:
- Right-click on the Whisker Menu and choose Properties
- Click on the Behavior tab
- Switch user command = dm-tool switch-to-greeter
(This is a command-line tool provided by lightdm. See dm-tool --help for more options)
Plymouth is the bootsplash application. Personally, I wouldn't bother using a bootsplash - boot times with a modern Linux are so quick now, you'd hardly have chance to see it. Plymouth can be a fiddly beast to get working as well, however, in the interests of completeness, here is a quick how to:
- Install Plymouth using apt or Synaptic:
- plymouth plymouth-drm plymouth-themes plymouth-x11 = 1,422KB
- Grab a copy of my modified Xubuntu theme:
- wget https://github.com/RichJack/Xubuntu/raw/master/debian-logo.tar = 737KB
- tar -xf debian-logo.tar
- mv debian-logo /usr/share/plymouth/themes
- rm debian-logo.tar
- This is identical to the Xubuntu theme, but without the Xubuntu logo
- Read this site before you begin:
https://wiki.debian.org/plymouth
Make any alterations as required by the above link to /etc/initramfs-tools/modules - Edit \etc\default\grub as described
- Run update-grub2 in a root terminal
- Run plymouth-set-default-theme --list and check debian-logo is one of the options
- Run plymouth-set-default-theme debian-logo
- update-initramfs -u
- Reboot and test the theme works!
- If it doesn't work, or you just see the white-blue progress bar, try this (definitely follow this if you are using VirtualBox) (Taken from https://lists.debian.org/debian-user/2012/01/msg02060.html):
- apt-get install v86d
- modprobe uvesafb
- cat /sys/bus/platform/drivers/uvesafb/uvesafb.0/vbe_modes | sort
- Pick a mode from the output and add to the GRUB_CMDLINE_LINUX_DEFAULT in /etc/default/grub
eg:-
nomodeset video=uvesafb:mode_option=1024x768-32,mtrr=3,scroll=ywrap - Then add the same resolution to GRUB_GFXMODE
- Edit /etc/initramfs-tools/modules to reflect your *chosen* resolution.
eg.:-
echo "uvesafb mode_option=1024x768-32 mtrr=3 scroll=ywrap" >> /etc/initramfs-tools/modules - Then apply those changes:-
echo FRAMEBUFFER=y > /etc/initramfs-tools/conf.d/splash
update-initramfs -u
update-grub2 - Alternatively try the Joy theme for Debian branded boot up.
This site has an excellent tutorial on creating your own Plymouth themes.
http://brej.org/blog/?p=158
Now you have completely themed your installation of Debian to look just like Xubuntu 14.04.
For the penultimate tutorial, I will discuss applications, sizes and which ones you can do without.
Now you have completely themed your installation of Debian to look just like Xubuntu 14.04.
For the penultimate tutorial, I will discuss applications, sizes and which ones you can do without.
No comments:
Post a Comment